

Where Does Dude Food Get Their Meat?
How Importing Meat is Killing the Economy and America's Farming Industry

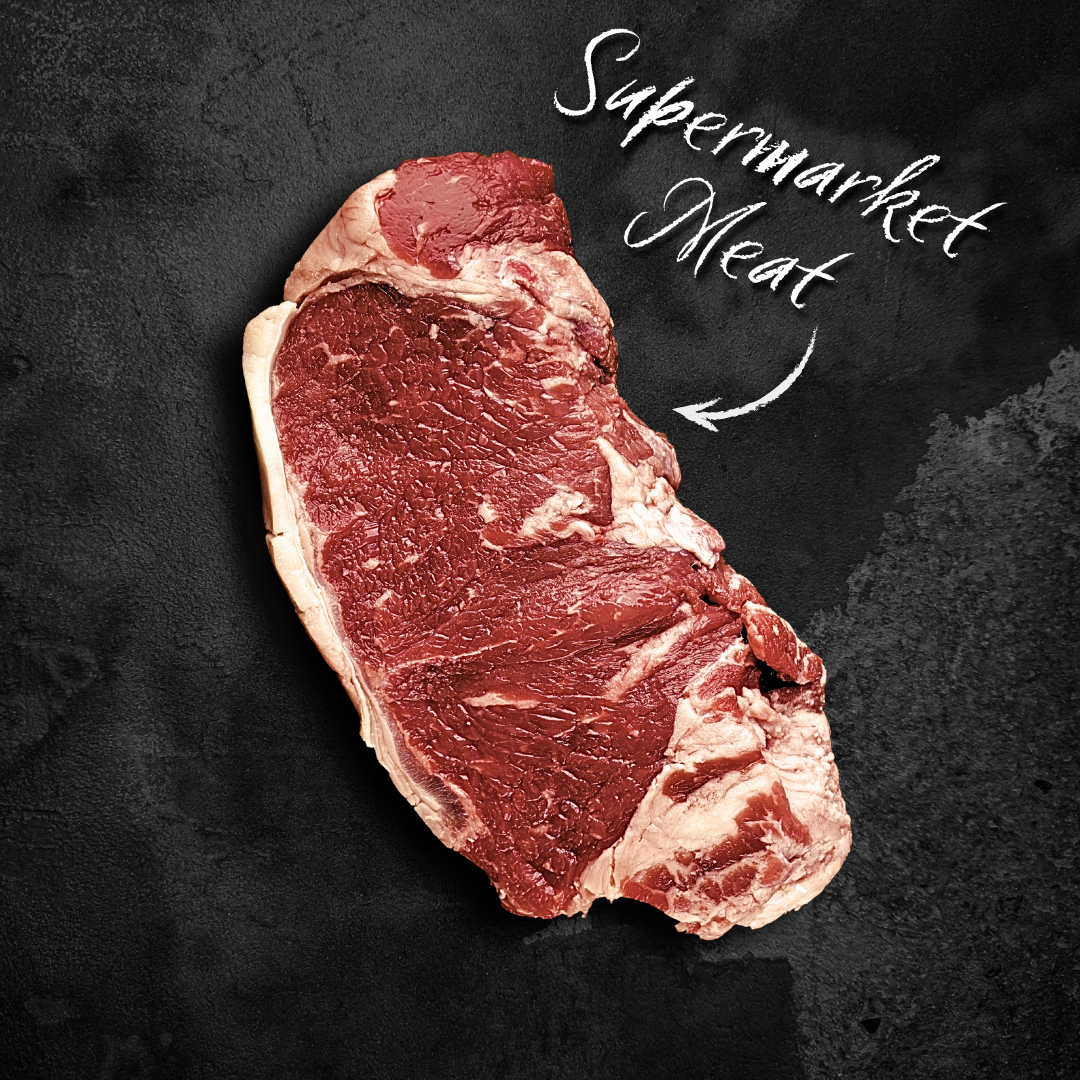
Imported Meat: Cheap for Supermarkets, Expensive for America
American Jobs Are Getting Cut

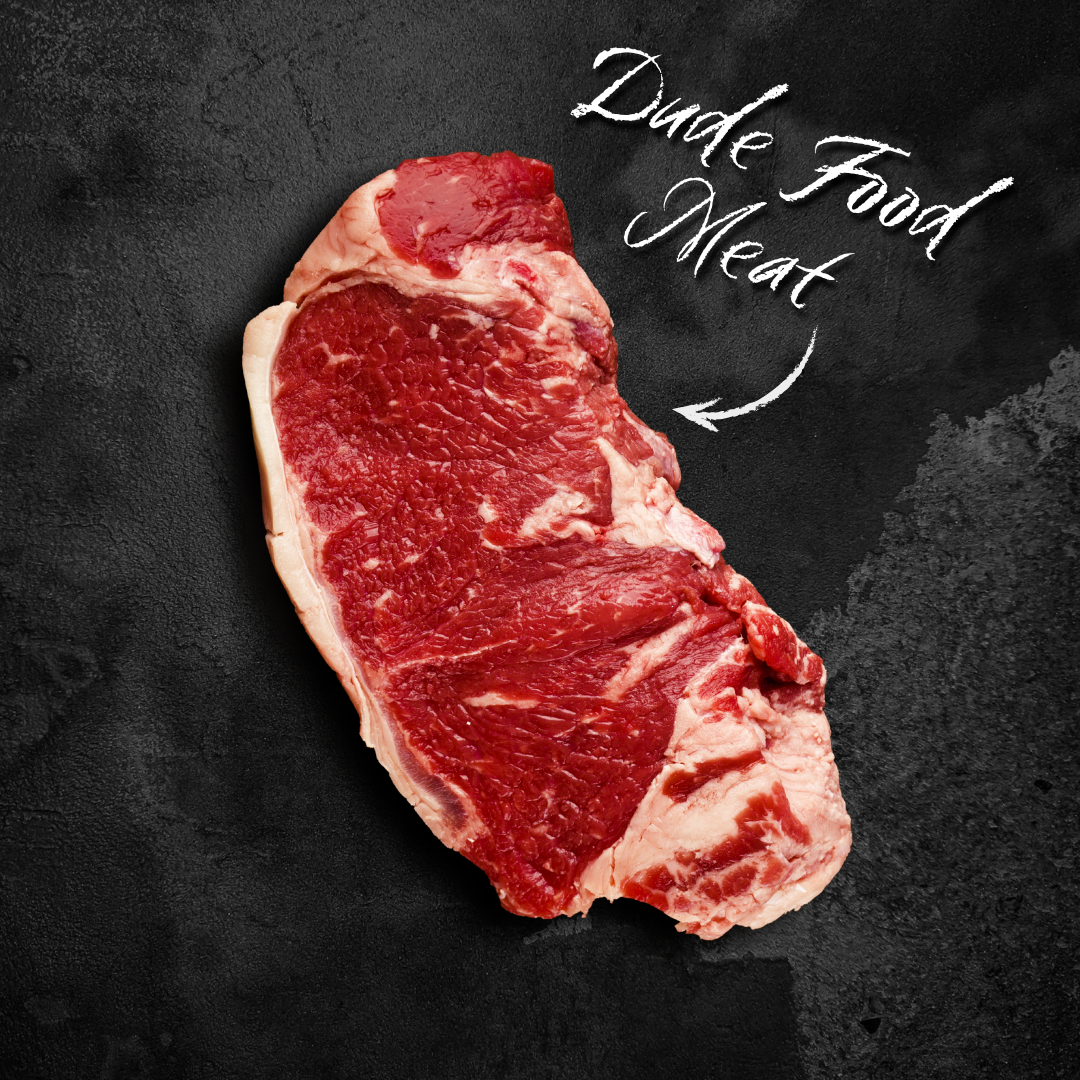
The Quality Just Doesn’t Stack Up

Celebrate The Start of Football Season!
It’s Time to Take a Stand for American Farmers
Dude, Let's Keep It Local

Frequently Asked Questions
Like What You're Reading? You'll Love These!


Hey Dudes!
Ready to take your steak game to the next level? We’re talking about filet mignon, the king of steaks. This cut is tender, juicy, and packed with flavor, making it perfect for impressing your buddies or just treating yourself to a gourmet meal. Follow this guide, and you’ll be cooking filet mignon like a pro in no time. Make sure to use our brand-new Dude Food Filet Mignon for the best results!
Ingredients:
- 4 Dude Food filet mignon steaks (about 1.5 inches thick)
- 2 tablespoons olive oil
- 4 cloves garlic, minced
- 2 sprigs fresh rosemary
- 2 sprigs fresh thyme
- 4 tablespoons unsalted butter
- Salt and pepper to taste
The Prep
Step 1: Season the Dude Food Steaks
- Pat it Dry: Pat the filet mignon steaks dry with paper towels. This helps get that perfect sear.
- Season Generously: Drizzle olive oil over both sides of each steak. Season generously with salt and pepper. Trust us, dudes, you want that flavor to shine through.
Step 2: Let the Steaks Rest
Allow the seasoned steaks to sit at room temperature for about 30 minutes. This helps them cook more evenly and absorb the flavors of the seasoning.
The Cook

Step 3: Preheat the Skillet
- Get it Hot: Preheat a cast-iron skillet over high heat. You want it nice and hot to sear those steaks and lock in the juices.
Step 4: Sear the Steaks
- Sear It Right: Add a tablespoon of olive oil to the skillet. Once the oil is shimmering, add the filet mignon steaks. Sear for 2-3 minutes per side to get a beautiful crust. Don’t move the steaks around too much; let the skillet do its job.
Step 5: Add Aromatics and Butter
- Flavor Boost: Add the minced garlic, rosemary, thyme, and butter to the skillet. As the butter melts, spoon it over the steaks. This basting process adds incredible flavor.
The Finish
Step 6: Finish in the Oven
- Bake to Perfection: Preheat your oven to 400°F. Once the steaks are seared, transfer the skillet to the oven. Bake for 5-7 minutes, depending on your desired level of doneness. Here’s a quick temperature guide:
-
- Rare: 120-125°F
- Medium Rare: 130-135°F
- Medium: 140-145°F
- Medium Well: 150-155°F
- Well Done: 160°F and above
Step 7: Let the Steaks Rest
- Rest and Relax: Once the steaks are done, remove them from the skillet and let them rest on a cutting board for about 5-10 minutes. This allows the juices to redistribute throughout the meat, making each bite juicy and flavorful.
The Serve
Step 8: Serve with Style
- Slice and Serve: If you’re feeling fancy, slice the steaks into thick strips and arrange them on a platter, or simply serve the whole steaks as they are.
- Add Extra Butter: For an extra touch of decadence, add a dollop of herb butter on top of each steak just before serving. Let it melt into the meat for a burst of flavor.
Optional Sides and Drinks
No epic steak dinner is complete without some killer sides and a cold drink. Here are some suggestions:
- Sides: Garlic mashed potatoes, roasted asparagus, sautéed mushrooms, Caesar salad.
- Drinks: A full-bodied red wine, a cold beer, or a classic Old Fashioned.
Cooking Tips
- Quality Matters: Investing in high-quality filet mignon from a reputable butcher or farm-to-table provider makes a huge difference in flavor and tenderness.
- Don’t Skimp on Seasoning: Generously seasoning your steaks is key to bringing out their natural flavors.
- Use a Meat Thermometer: To nail the perfect doneness, use a meat thermometer. It takes the guesswork out of cooking.
- Resting is Crucial: Letting your steaks rest after cooking allows the juices to redistribute, resulting in a juicier, more flavorful bite.
Frequently Asked Questions
Q: Can I cook filet mignon on the grill?
A: Absolutely, dude! If you prefer grilling, sear the steaks on high heat for 2-3 minutes per side, then move them to indirect heat and finish cooking to your desired doneness.
Q: How do I store leftovers?
A: Store any leftover filet mignon in an airtight container in the fridge for up to 3 days. Reheat gently in a skillet or enjoy cold in a steak salad.
Q: Can I use different herbs?
A: Definitely! Feel free to experiment with different herbs like oregano, basil, or even a spice rub. Make it your own!
The Dudefood Difference
At Dudefood, we believe in using the highest quality, farm-to-table ingredients. Our filet mignon steaks are sourced from local farms that prioritize animal welfare and sustainable practices. This not only ensures the best flavor but also supports local communities and the environment.

Ready to master a dish that’s both impressive and insanely delicious? Chicken Kiev is a classic that’s all about juicy chicken breasts stuffed with herbed butter, then breaded and fried to golden perfection. This isn’t just any chicken dinner – this is a dish that will have your buddies calling you a culinary genius. So, grab your apron, get your frying pan ready, and let’s make some epic Chicken Kiev! Featuring our Dude Food Chicken Breasts!
Ingredients:
- 4 boneless, skinless Dude Food chicken breasts
- 1/2 cup unsalted butter, softened
- 2 tablespoons fresh parsley, chopped
- 1 tablespoon fresh dill, chopped
- 2 cloves garlic, minced
- 1 teaspoon lemon juice
- Salt and pepper to taste
- 1 cup all-purpose flour
- 2 large eggs, beaten
- 1 cup breadcrumbs
- 1/4 cup grated Parmesan cheese
- 1/4 cup vegetable oil for frying
The Prep
Step 1: Make the Herbed Butter
- Mix it Up: In a bowl, combine the softened butter, parsley, dill, garlic, lemon juice, salt, and pepper. Mix until everything is well incorporated.
- Shape and Chill: Place the butter mixture on a piece of plastic wrap and roll it into a log shape. Wrap it tightly and refrigerate for at least 30 minutes, or until firm.
Step 2: Prep the Chicken Breasts
- Butterfly the Chicken: Using a sharp knife, carefully butterfly each chicken breast. This means slicing them horizontally almost all the way through and then opening them like a book.
- Pound it Out: Place each butterflied chicken breast between two pieces of plastic wrap and pound them with a meat mallet until they are about 1/4 inch thick. This ensures they cook evenly and can hold the herbed butter.
Step 3: Stuff and Roll
- Slice the Butter: Once the herbed butter is firm, cut it into 4 equal pieces.
- Stuff the Chicken: Place one piece of herbed butter in the center of each pounded chicken breast. Fold the sides over the butter and roll it up tightly. Secure with toothpicks if needed to keep everything in place.
The Bread and Fry
Step 4: Bread the Chicken
- Set Up Your Station: Place the flour in one shallow dish, the beaten eggs in another, and the breadcrumbs mixed with Parmesan cheese in a third.
- Coat the Chicken: Dredge each stuffed chicken breast in the flour, shaking off any excess. Dip it into the beaten eggs, then coat it thoroughly with the breadcrumb mixture. Make sure each piece is well covered to get that perfect crispy crust.
Step 5: Fry it Up
- Heat the Oil: In a large skillet, heat the vegetable oil over medium-high heat.
- Fry the Chicken: Carefully place the breaded chicken breasts in the hot oil. Fry them for about 3-4 minutes per side, or until golden brown and crispy. You might need to do this in batches, depending on the size of your skillet.
The Bake
Step 6: Finish in the Oven
- Bake to Perfection: Preheat your oven to 350°F. Once the chicken breasts are fried, transfer them to a baking sheet and bake for 15-20 minutes, or until the chicken is cooked through and the internal temperature reaches 165°F.
- Rest: Let the chicken rest for a few minutes before serving. This helps the juices redistribute and ensures the butter stays inside.
The Serve

Step 7: Plate It Up
- Remove Toothpicks: If you used toothpicks to secure the chicken, be sure to remove them before serving.
- Garnish and Serve: Serve your Chicken Kiev with a side of mashed potatoes, a fresh salad, or some roasted veggies. Garnish with a bit of extra parsley for that final touch.
Optional Sides and Drinks
No epic meal is complete without some killer sides and a cold drink. Here are some suggestions:
- Sides: Garlic mashed potatoes, steamed asparagus, roasted Brussels sprouts.
- Drinks: A crisp white wine, a cold beer, or a refreshing iced tea.
Cooking Tips
- Keep the Butter Cold: Keeping the herbed butter cold and firm makes it easier to stuff and prevents it from leaking out during cooking.
- Pound Evenly: Make sure to pound the chicken breasts evenly so they cook at the same rate.
- Don’t Skip the Rest: Letting the chicken rest after baking keeps it juicy and allows the butter to settle inside.
Frequently Asked Questions
Q: Can I prepare Chicken Kiev ahead of time?
A: Absolutely, dude! You can prepare the stuffed and breaded chicken breasts ahead of time and refrigerate them. When you're ready to cook, just fry and bake as directed.
Q: How do I store leftovers?
A: Store any leftover Chicken Kiev in an airtight container in the fridge for up to 3 days. Reheat gently in the oven to maintain the crispy crust.
Q: Can I use different herbs in the butter?
A: Definitely! Feel free to experiment with different herbs like tarragon, chives, or basil to suit your taste.
The Dude Food Difference
At Dude Food, we believe in using the highest quality, farm-to-table ingredients. Our chicken breasts are sourced from local farms that prioritize animal welfare and sustainable practices. This not only ensures the best flavor but also supports local communities and the environment.